Exercise To Lose Belly Fat

Exercise to Lose Belly Fat – Home Workouts
We often get asked the question, “What exercise should I do to lose belly fat?”. This is a common goal among many of our clients! As an elite in-home personal training company, we have perfected these home workouts for losing belly fat. Also, if this is your goal, you’re in luck, because we find this goal to be one of the easiest for us to achieve. So, get comfortable while I unfold some of our most valuable tips and exercises to lose belly fat.
Let’s get started. Prepare yourself for mostly good news, with a little bit of bad.
Everyone wants to get the bad news out of the way first, right? Ok. Well, the bad news is that, scientifically speaking, there is no single exercise that targets belly fat in particular. That’s referred to as “spot reduction”, and it has been debunked by numerous studies. Our bodies all store fat differently, but we all have one thing in common: we lose fat in the reverse order that we gained it. So, what does that look like? If your body first stored some fat in your buttocks, before increasing storage in your belly, then that belly fat will be the first to come off followed by the buttocks. Make sense?
Now for the good news. The best exercises to lose belly fat are pretty basic and easy to perform. Even better, they can be done from the comfort of your own home! Before we get into the actual exercise plan, let’s get you thinking a little bit more about how to customize your journey to a trimmer midsection.
Consistency is the First Key Ingredient
When it comes to losing belly fat, the first key ingredient is consistency! Even the best exercises won’t be very effective against shedding that unwanted belly fat if they aren’t performed on a regular basis. Your body will only be forced to change its fat storage and shape if it is consistently convinced it needs to do so! So, how often do you need to work out? We’ll get there. First, let’s get motivated. To truly master a consistent workout schedule, begin by harnessing all your motivation. This will be the foundation of your success story. Seriously! Start this process by thoughtfully answering some questions.
Why do you want to lose the belly fat?
Make sure your reasons are important enough to you. Losing belly fat requires a lifestyle change, and if your heart is only halfway invested, the wheels are more likely to come off when the rubber meets the road.
Now, let’s get specific about your goals.
How many pounds do you want to lose?
Why that specific number of pounds?
These questions are very helpful in defining a target. Targets are critical for maintaining motivation, so defining yours is a step you won’t want to overlook. Once the hard work begins, seeing progress toward your target is one of the things that will help get you motivated on the most tired, difficult, and vulnerable moments of your journey.

Lifestyle Changes
We are going to get into some of the best exercises for losing belly fat. I promise, but if you want to lose the belly fat for good, it is important to understand what is happening inside your body causing the belly fat. But this is another important set of questions before we get to work. It’s time to think about lifestyle changes that may be helpful to address. Consider the following question. What caused you to gain weight?
This seems like an obvious question to consider, but a lot of people don’t truly think about what led to the weight gain. In fact, most people we interview with this question believe the weight gain is something that just “happened” to them. This is almost never true. If you’re having a difficult time pinpointing what may have caused you to gain belly fat, we’ve put together a list of some of the most common reasons.
- Hormone Changes
- Lack of activity (this also enhances hormone changes)
- Having Children
- Injury
- Change in Eating Habits
- Job or Lifestyle Change That Reduced Physical Activity
The last one, job or lifestyle changes to a more sedentary lifestyle, is one that catches many people by surprise. Let’s illustrate how this works by examining a new work-from-home job position. This is a very common one we are seeing these days, as many people have made the switch from an office job to remote work.
Consider, the average person working at an office needs to walk 200 yards from their car to their desk. This same job requires about a 40 yard walk to the restroom, and the average person uses the restroom four times during a workday. Now, let’s consider lunch. This will require you to walk to your car, to the restaurant, and back, which we will assume will be about 600 yards total. So, in total, this person walked 2/3 mile more than they would have if they were working from home (and we’re not even discussing calorie intake increase when you’re working so close to your own kitchen). Walking 2/3 of a mile will typically burn around 65 calories, which doesn’t sound like a lot, but it adds up! A pound of fat is 3500 calories, so the new work-from-home job is going to cause you to gain a pound of fat every 7 weeks, or roughly 8 pounds per year.
Hopefully you have been able to pinpoint the reason for the weight gain, and depending on which of those categories that you fit into, there may be some additional things you can do beyond the exercise plan we are about to unfold. If you believe you may have had a hormone change, you may want to schedule a visit with your doctor to see if you are a good candidate for hormone therapy. Some of our clients will also get a stress test to ensure they are not experiencing elevated cortisol levels. Elevated cortisol can have many negative side effects, including increases in belly fat.
Let's Begin Losing the Belly Fat
The first step, even before exercising, is to make sure your body is ready for all that we are about to throw at it. It’s time to do a movement assessment to ensure there are no muscle imbalances or contra indications. We highly recommend enlisting a personal trainer at this stage, because muscle imbalances and improper technique are leading causes of injury. The risks are even greater if the weight loss has been sudden and/or recent. However, for the do-it-yourselfers, there is a blog on the NASM website that may be helpful.
As we begin the exercise, please be careful and use your best judgement. An injury can be one of the biggest setbacks and obstacles to losing belly fat and achieving a healthier you.
Best Exercises to Lose Belly Fat
Now for some more good news. While you have gained unwanted belly fat, your body has also gained muscle to support the weight gain. So, you’re actually stronger than you were before! One of our goals will be to maintain as much of this muscle and strength as possible while we begin shedding the unwanted belly fat.
You may be pleasantly surprised to learn that the very best exercise to begin with is walking! Walking is a very good way to burn calories without any unwanted joint impact at this point. Many people try to lose belly fat by running, which is not good when you’re carrying extra weight. Running can be hard on your joints, especially if you are carrying around extra weight and/or running on concrete. Once you shed some initial pounds through walking, exercise will be easier and present less risk for injury.
We’re going to focus on walking three times per week for the first two week before we introduce additional exercise. The weight loss goal during the first month is 4-8lbs, but it may be much higher due to water weight reduction, etc.
So, how do you lose the most belly fat while walking? Start by getting a heart rate monitor.

Referencing the chart above, ideally, you want to maintain a heartrate that is in the fat burn target zone, for your age, as much as possible during your walk. So, how long should you walk for? Begin with 20 minutes and work up from there. However, you will not want to ever exceed 45 minutes.
The Fartlek Alternative. A Mobile Trainers Favorite.
An underutilized technique that we love is Fartlek training. In this method, you don’t track times. Don’t put any pressure on that. There are no performance goals. Simply start walking with a 50% perceived exertion. If you’re walking and feeling good, maybe go a little faster or even jog. Pick up the pace until you feel tired, and then stop jogging and walk until you feel good again. Do it as often as you like it.
This is essentially interval training, and it can help create a better baseline to work with in your return to heavier exercise. However, this method requires you to be disciplined enough to push yourself but cautious enough not to overdo any impact associated with running.
If it’s easy, you need to push it harder. If you don’t feel sore after or tired during, you aren’t working hard enough. You should increase cardio duration, more intervals, walk faster,
Worth noting, If you’re going at 50% perceived effort, your speed will naturally increase on its own as your body adapts to the exercise, so you will naturally improve and not need to worry about tracking it yet.
Week 2: Exercises to Lose Belly Fat
We're now going to start doing some light core work to begin preparing your body for the next phase. On the days you walk, also do three rounds of each of these two exercises. Hold the plank position as long as you can, with a goal of 60 seconds. Perform 15 repetitions of the butterfly crunches.

Plank
With your stomach facing the floor, place your hands against the floor, with your shoulders above your elbows. With your core engaged, your body should make a straight line from your heels to your head.
You won’t be doing repetitions here. Hold your plank for one minute or as long as you are able while maintaining proper form.
Helpful hints:
When in position, squeeze your glutes. This will likely make things a lot more difficult, feeling increased tension in your core. This is a good thing! This will help you get more out of it and get results faster

Bicycle crunches
Begin by lying on the floor with your knees bent, feet flat, and fingers clasped behind your head. While keeping your back flat against the floor, slowly extend the right leg, draw in the left knee, and touch the left knee with your right elbow. Now, extend the left knee, raise the right knee, and touch that knee with your left elbow. This is considered one repetition.
Helpful Hints:
Do not apply pressure to the back of your head during the movement.
Week 3: Exercises to Lose Belly Fat
Let's turn up the intensity. Your body will be both shedding belly fat and gaining muscle during this time, so don't watch the scale!
Continue the walking and exercises from week 2, 2-3 times per week. In addition to those days, you will introduce the exercises outlined below 2 times per week as well. However, please note that if you are still store from the last workout, you should wait until it passes before doing these exercises again. Refer to the reference at the end of this article to gauge your soreness
How many reps?
For your first week, limit your repetitions to 8. If your muscles are not overly sore, you can continue to increase the repetitions for the respective exercises. Generally, we recommend doing 10-15 reps per exercise, where you are nearing the end of your capacity for repetitions at the end of each set. This shouldn’t be easy. If it is, it’s time to tack on some additional reps.
Circuit #1
Perform each of the following three exercises in succession, with as little rest as needed between exercises. Rest up to 90 seconds between each round and perform a total of three rounds.

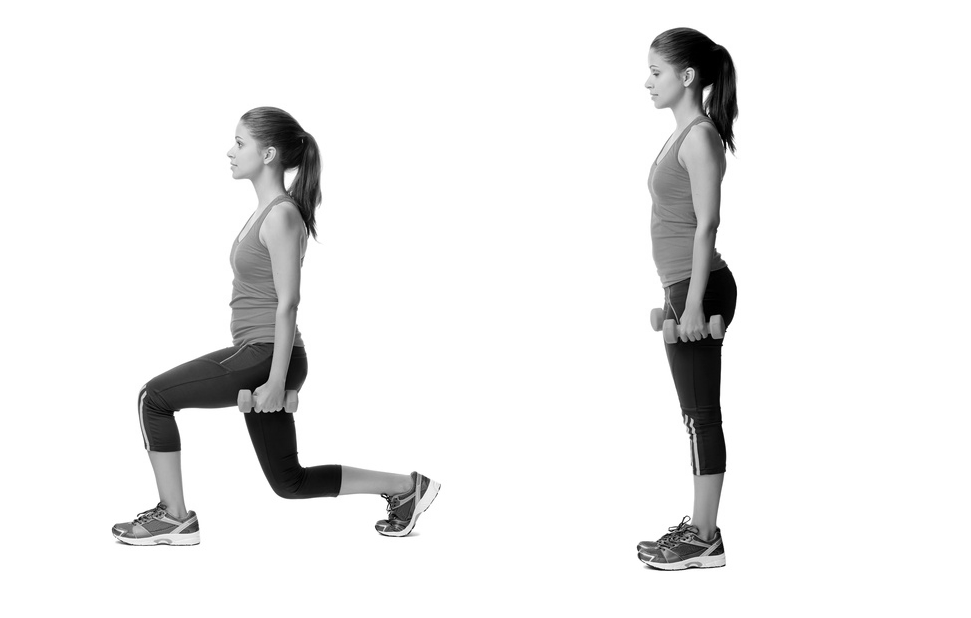
Standing Lunge
Begin in a normal standing position, with your arms at your side. Step one leg forward and lower your torso until both knees are bent 90 degrees. Your front knee should be directly on top of your heel, with nearly all of your weight resting in the front heel. Then, slowly press through that front heel until you return your torso to the top.
Helpful hints:
Exhale on the way up
Your rear foot should only act as a stabilizer, not bear significant weight

Goblet Squat and Press
Begin by holding a dumbbell in front of your chest. Both hands should be cupped underneath the dumbbell head, with your wrists bent and palms facing up. Next, lower your body into squat position, letting your hips slide back, until your upper thighs are parallel to the floor. Now, press through your heals to return to the original position and press the dumbbell overhead. Lastly, lower the dumbbell back down to the position you started in.
Helpful Hints:
Keep your elbows under your wrists at all times, and do not let arms rest against your body. Toes should be angled slightly out and the weight should be in your heals.
Inhale as you lower your body, exhale as you stand and press.

Butterfly Crunch
Begin on your back with your knees bent, hips open, and feet together. This is also referred to as the butterfly position. Next, extend your arms over your head, resting them on the floor behind you. Now, bringing your shoulder blades off the ground and lifting your pelvis, extend your hands forward. Slowly return back to the starting position.
Helpful hints:
Your lower back should not leave the ground.
Never crunch up, crunch down. Always drive lower back into floor, not worth about how bight shoulders come off he ground. Butterfly will simultaneously stretch the inner thighs and pelvic tilt.
Super Set
Perform each of the following two exercises in succession, with as little rest as needed between exercises. Rest up to 90 seconds between each round and perform a total of four rounds.

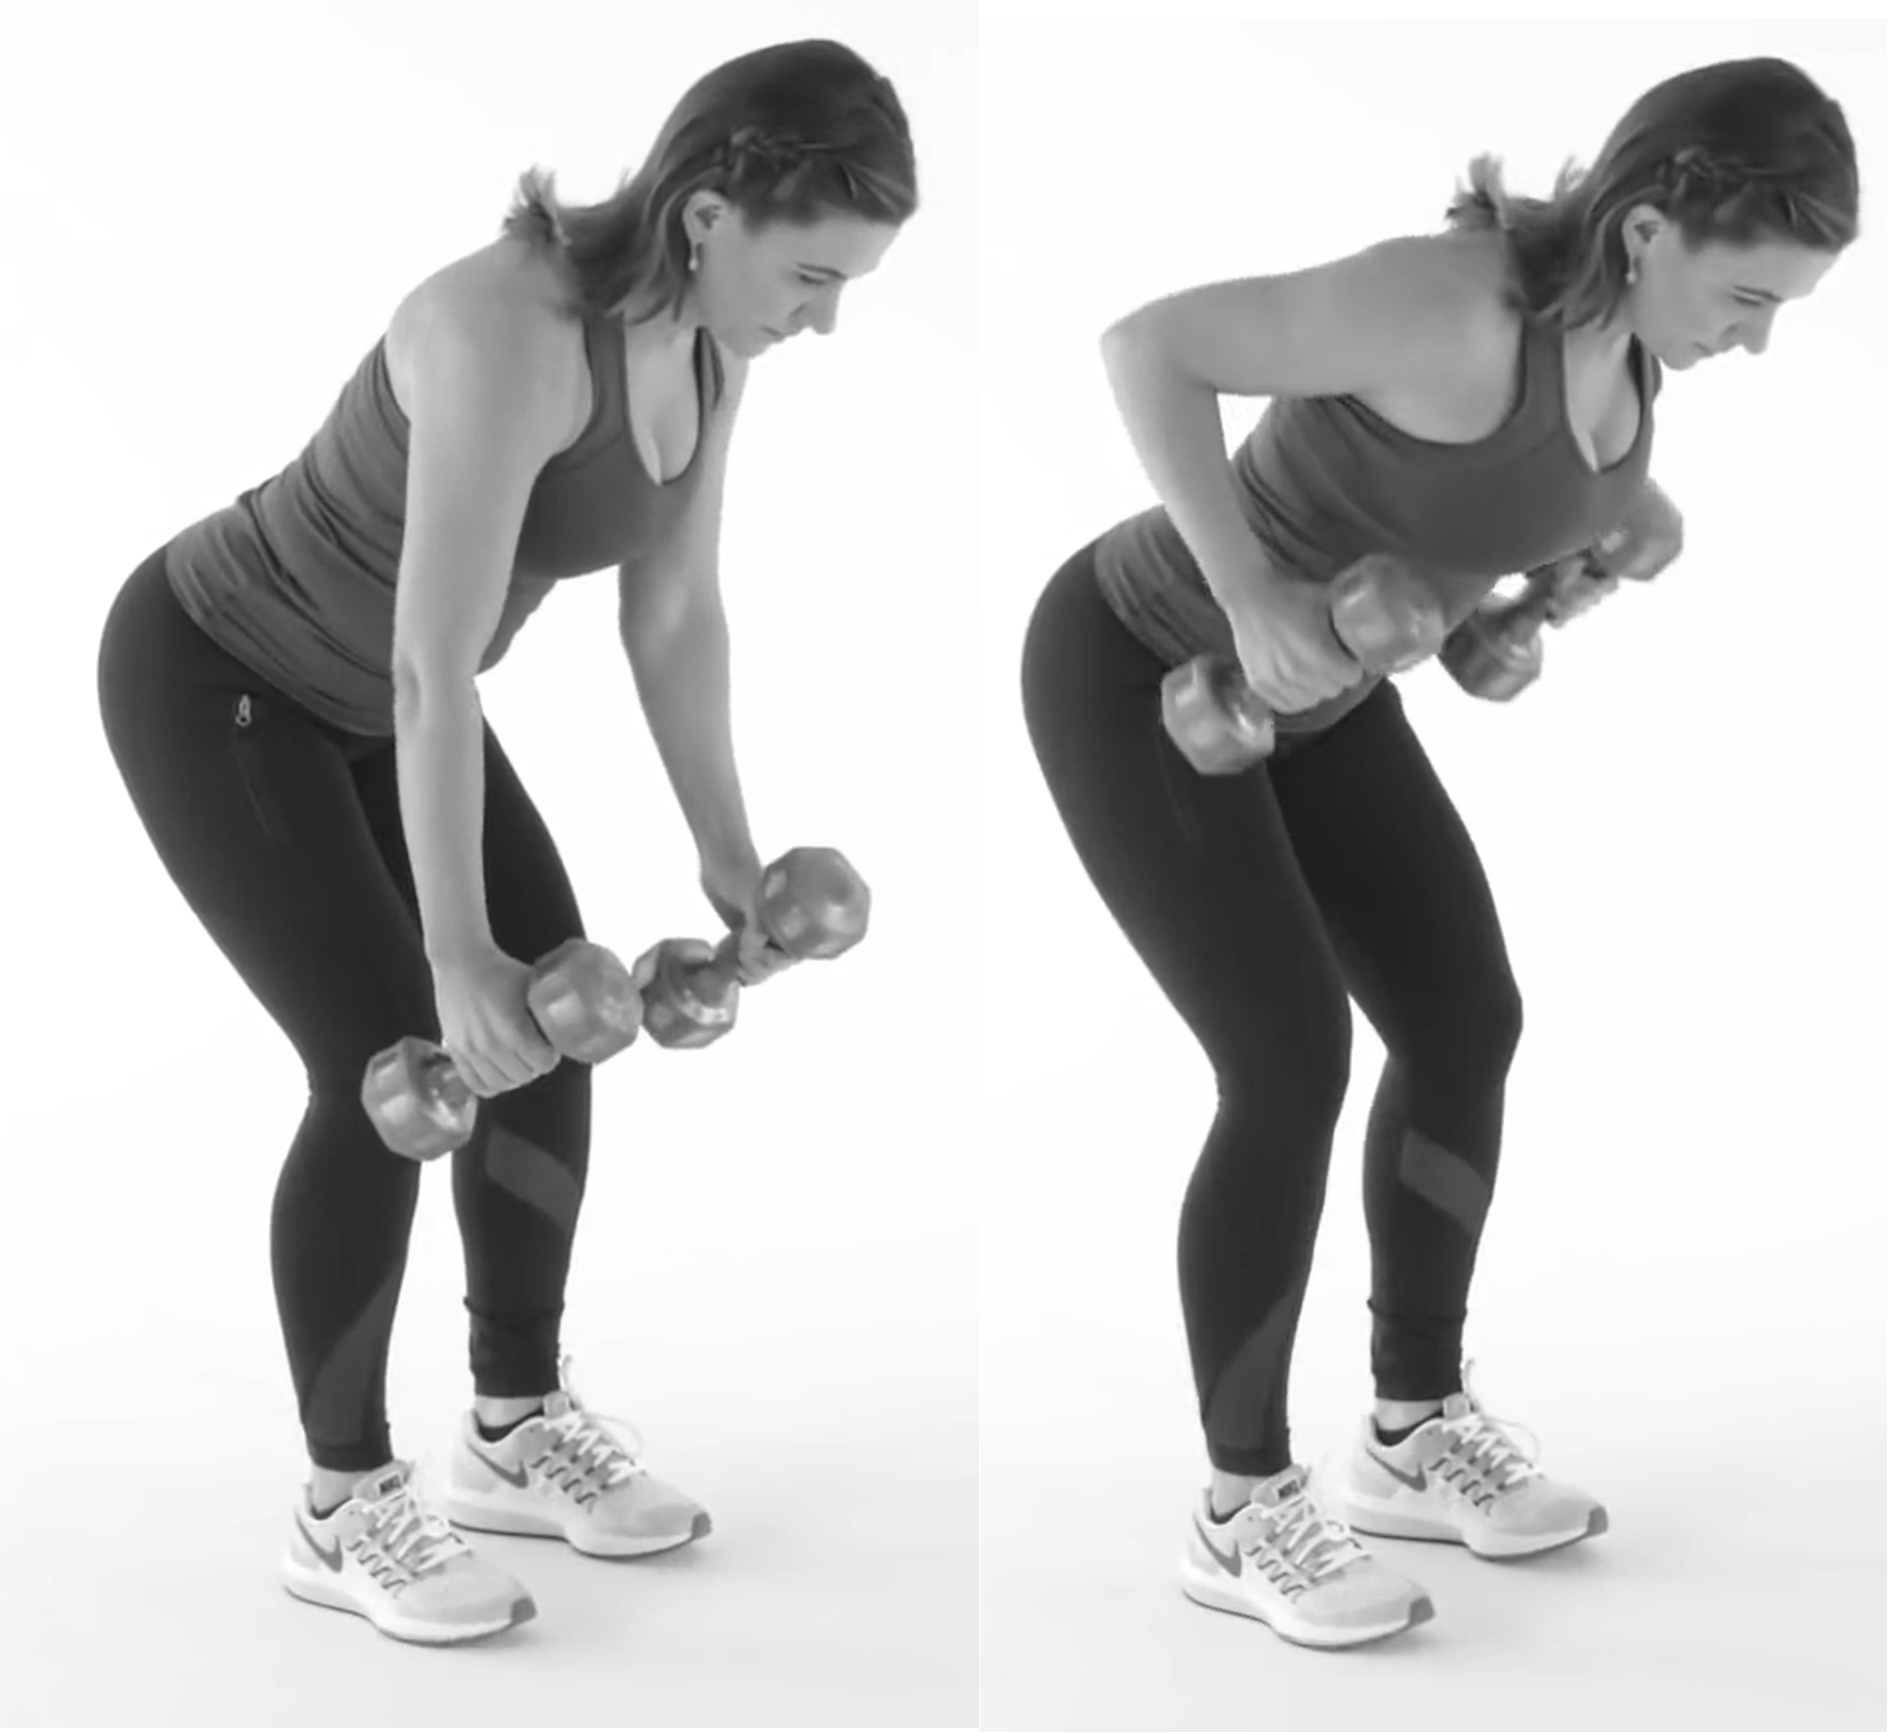
Bent over row
Holding a dumbbell in each hand, bend over at the waist, keeping a neutral spine position. Your knees should be flexed until your torso is near horizontal. Then, keeping your elbows your upper arm parallel with your torso, pull the dumbbells up to your sides before lowering them to the starting position.
Helpful Hints:
Always pull through elbow, not with the hand. Should feel in stomach.
If you feel in your lower back, squeeze stomach and glutes
Breathing should be an inhale on the way down and an exhale while pulling the dumbbells up.

Plank
With your stomach facing the floor, place your hands against the floor, with your shoulders above your elbows. With your core engaged, your body should make a straight line from your heels to your head.
You won’t be doing repetitions here. Hold your plank for one minute or as long as you are able while maintaining proper form.
Helpful hints:
When in position, squeeze your glutes. This will likely make things a lot more difficult, feeling increased tension in your core. This is a good thing! This will help you get more out of it and get results faster
Circuit #2
Perform each of the following three exercises in succession, with as little rest as needed between exercises. Rest up to 90 seconds between each round and perform a total of three rounds.

Inch Worms
Begin in a normal standing position. Bend over at the waist, and slowly walk out to the plank position with your hands. Once you reach the plank position, reverse direction until your hands near your toes. Lastly, shift your weight to your heels, and squeeze your glutes to leverage your body back into the starting standing position.
Helpful Hints:
Over achievers can do a push up once in the plank position

Glute bridges
Begin laying down on the ground with your knees bent and feet flat on the ground. Your arms should also be drawn to your sides with your palms facing the floor. Slowly lift your hips off the ground until you form a straight line between your knees, hips, and shoulders. Hold this position, squeezing your glutes, before slowly lowering your hips and returning to the starting position.
Helpful Hints:
Squeeze your glutes from the time you begin raising your hips until the time you return to the floor.
Keep hips parallel to ground.

Push Ups
Begin in a plank position. Then, lower your chest to the floor, maintaining a straight line between your head and your heals. Return to the starting position by pushing through your palms.
Helpful Hints:
Turn your hands slightly in to 45 degrees. Your upper arms should make a 45 degree angle with your torso while pressing.
Don’t lock elbows at the top.
Push-Ups and other presses will fix the dreaded Turkey wobble. Press downs or kick back won’t fix that, because they work the short head of the muscle, whereas presses work the long head. Squeeze your glutes if feel it in your back.
Stretching
At the end of each workout, you should be stretching. The stretches below, Hurdle Stretch, Pigeon Pose, and Trunk Twist are meant to loosen your hips, glutes, and hamstrings. Stretching will help increase your range of motion, improve your future exercise performance, prevent injury, and make your body feel like a much better place to live in.


Let’s also address muscle soreness. At this stage, we don’t yet know your muscular strength, endurance, and/or recovery. So, it’s time to find out! After introducing an exercise day like the one below, determine where you are sore and for how long. This will tell you where you can scale. Increase repetitions for areas the muscles that are recovering quickly, but do not increase repetitions for those that are not.
Rules for soreness- One Day: You’ve built endurance
- Two Days: You’ve built endurance and strength
- Three Days: You overdid it
Range of Motion
Follow the instructions below for each exercise. If you experience any pain while doing the movement, reduce the range of motion until you no longer feel pain.
Week 6 and Beyond
At week 6, it is time for a re-evaluation. Ask yourself, are you still being challenged? We like to ask people to give themselves a grade 1-10. If you're below an eight, you can likely continue with this routine until you start reaching plateaus.
However, once you begin nearing a grade of 10, it is time to up the intensity again, or you will see your results slow. We again strongly recommend enlisting a personal trainer, so they can help you advance to the next level. A fitness professional is going to be able to make recommendations that are specific to your body, your kinetics, and your goals.
We would love to continue laying out a recommended regimen beyond week 6, but for many reasons, we don't believe in one-size-fits-all programs, as experience tells us that yields one-size-fits-few results. It is also too difficult to ramp up recommendations at this stage without seeing your movement, because increasing the intensity from here can really increase your risk of injury if technique and muscular balance is not on point.
Mobile Trainers
If you made it this far, we truly wan to congratulate you on a big win! Soak in what you've accomplished, as you've likely shed pounds of belly fat, put on pounds of muscle, and have made physical fitness part of your daily routine. You're on a roll, and we want you to keep on the fast track to your results. Mobile Trainers is expanding its services across the country, and our staff of elite in-home personal trainers would love to help you out if you are within any of the following service areas:


